Create a fun and easy zipper pouch to organize your essentials. Customize the size, perfect for beginners, and quick to make using leftover fabric. Learn to sew a practical accessory with this simple guide.
Overview of the Project
This zipper pouch tutorial guides you through creating a versatile and practical accessory. Perfect for beginners, the project requires minimal fabric and time, making it ideal for quick DIY sessions. You can customize the size and design to suit your needs, whether for organizing small items, storing makeup, or as a gift. The pouch can be made with or without a lining, and optional features like gussets or boxed corners add functionality. Using a zipper as the closure ensures durability and ease of access. This project is great for using scrap fabric and can be completed in about 20 minutes, making it a rewarding and efficient sewing activity. Customize the look with your favorite fabrics and optional details like keychains or straps for a personalized touch.
Benefits of Making a Zipper Pouch
Making a zipper pouch offers numerous benefits, especially for sewing enthusiasts. It’s a quick and easy project, perfect for using leftover fabric, making it a great scrap-busting opportunity. The pouch can be customized to various sizes and purposes, such as organizing small items, storing makeup, or serving as a gift. This project is ideal for beginners, helping to build confidence and improve sewing skills, particularly with zippers. Additionally, the pouch is practical for daily use, providing a stylish and functional way to keep belongings tidy. With optional features like linings, gussets, or keychains, you can personalize the design to suit your preferences. It’s also an eco-friendly way to repurpose fabric and create something useful. Overall, a zipper pouch is a versatile, rewarding, and practical DIY project.
Materials and Tools Needed

Gather fabric, zipper, thread, scissors, sewing machine, iron, and zipper foot. Optional tools include seam ripper, measuring tape, and cutting mat for precision.
Fabric Requirements
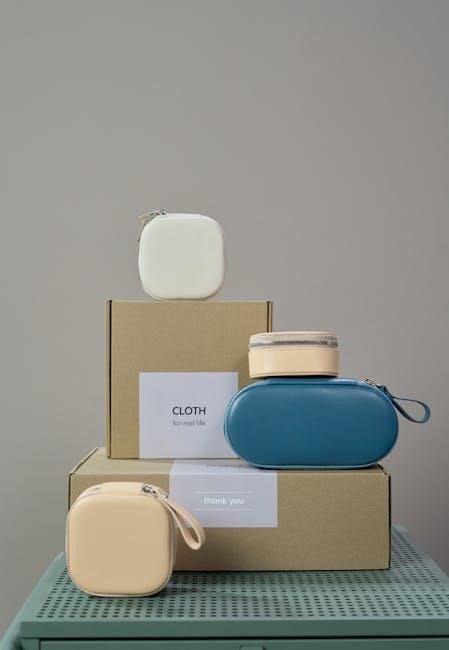
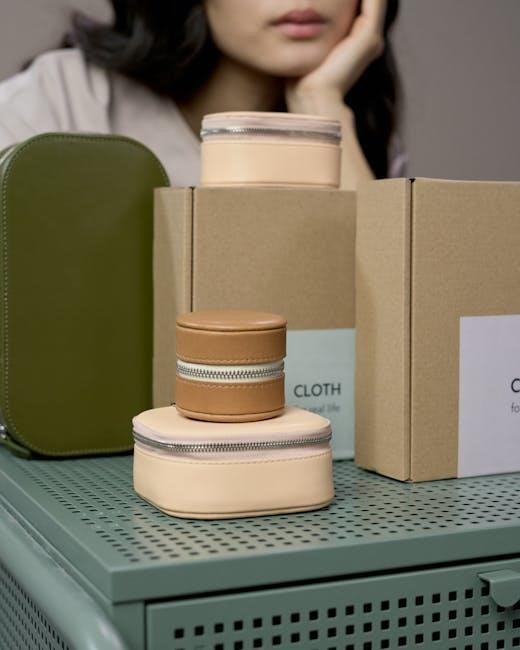
Choose durable fabrics like quilting cotton, canvas, or twill for your zipper pouch. Leather works well for a stylish, lined option. Measure your zipper length to determine fabric width, adding 4.5cm (1 3/4 inch) for seam allowance. Cut fabric pieces slightly larger than the zipper tape for easy handling. For a lined pouch, use contrasting or matching fabric for the lining. Consider pre-cut charm squares for a quick project. Fabric size can vary based on desired pouch dimensions, making it adaptable for small or large storage needs. Ensure fabrics are pre-washed and ironed for a professional finish. Optional gussets or patchwork designs can add functionality and visual interest to your pouch.
Zipper Selection and Preparation
Select a zipper that matches your pouch size, ensuring it’s long enough to allow easy opening. Measure from the slider to the stop for accurate length. Add 4.5cm (1 3/4 inch) to the zipper tape length for seam allowances. Prepare zipper tabs by cutting small fabric squares, folding them in half, and placing them over the zipper ends. This prevents fraying and gives a polished look. Press the tabs to secure them before sewing. Use a zipper foot for precise stitching, ensuring the zipper aligns evenly with the fabric edges. Proper preparation guarantees a smooth sewing process and a professional finish for your pouch.

Essential Sewing Tools
To successfully create a zipper pouch, gather the following essential tools: a sewing machine for stitching, a rotary cutter and mat for precise fabric cutting, scissors for trimming, and an iron for pressing seams. Use a zipper foot to sew evenly along the zipper edges and ensure alignment. Pins will help secure fabric layers while sewing. A measuring tape or ruler is necessary for accurate cuts, and a seam ripper is handy for correcting mistakes. Optional but useful tools include a walking foot for heavy fabrics and a lint roller to keep your work area clean. Having these tools ready ensures a smooth and enjoyable sewing experience.

Step-by-Step Sewing Guide
Discover an easy, step-by-step guide to sewing a zipper pouch, covering fabric preparation, zipper alignment, and construction for a professional finish.
Preparing Fabric Pieces
Start by washing, drying, and ironing your fabric to ensure a smooth sewing process. Measure and cut two main fabric pieces based on your desired pouch size or zipper length. For a standard pouch, cut rectangles slightly larger than the zipper, adding a 1/2-inch seam allowance around all sides. If using a lining or gusset, cut additional pieces accordingly. Place fabrics on a flat surface and ensure they are aligned properly before proceeding. Accurate measurements are key to achieving a professional finish. Use rotary cutters or sharp scissors for precise cuts, and double-check your dimensions before moving to the next step.
Aligning and Sewing the Zipper
Place the zipper along the top edge of one fabric piece, aligning the zipper’s edge with the fabric’s raw edge. Use a zipper foot on your sewing machine for precise stitching. Position the second fabric piece on top, right sides together, ensuring the zipper is centered. Pin the layers securely to maintain alignment. Sew along the zipper edge with a 1/4-inch seam allowance, backstitching at the start and end for durability. Flip the fabric to the right side and press the seam to conceal the zipper tape. This step ensures a clean finish and prepares the pouch for assembly. Repeat the process for the opposite side if using a dual-sided zipper design.
Constructing the Pouch
Place the zipper-faced fabric pieces right sides together, aligning the edges. Sew along the sides and bottom, leaving a small opening to turn the pouch right side out. Use a 1/4-inch seam allowance, ensuring the zipper lies flat. Backstitch at the beginning and end for strength. Carefully trim excess fabric at the corners for a neat finish. Turn the pouch through the zipper opening, pressing the seams with an iron. Fold the raw edges of the opening inward and sew it closed by hand or machine. Topstitch along the edges for a polished look. Your pouch is now ready to use, offering a practical and stylish way to store small items.
Finishing Touches
Once the pouch is sewn, carefully turn it right side out through the zipper opening. Press the seams with an iron to create crisp folds. Fold the raw edges of the opening inward and sew them closed by hand or machine for a clean finish. Topstitch along the edges of the pouch for a professional look. Trim any excess thread or fabric. Optionally, add a decorative tab or label to the zipper. Use a lint roller to remove loose fabric threads. Your zipper pouch is now complete, ready to store small items like makeup, pens, or travel essentials. Ensure all seams are secure for durability.
Customization and Variations

Elevate your zipper pouch with creative touches. Add a lining for a polished look, incorporate a gusset for extra space, or use vinyl for a wipeable interior. Experiment with fabric patterns, leather accents, or decorative stitching for a unique style. Attach a keychain or charm for functionality and flair. These variations allow you to tailor the pouch to your preferences, making it both functional and personalized. Explore different shapes, sizes, and embellishments to create a one-of-a-kind accessory.
Adding Lining or Gusset
Add a lining to your zipper pouch for a professional finish and extra durability; Use contrasting fabric for a pop of color or match it with the exterior for a cohesive look. A gusset can be added to create a flat bottom, increasing the pouch’s capacity. For a practical touch, incorporate a vinyl lining, making the interior wipeable and perfect for storing small wet items or makeup. To add a lining, sew the main fabric and lining together, leaving a small opening to turn the pouch right side out. Topstitch the edges for a polished appearance. Optional features like keychains or charms can enhance functionality and style, allowing for further customization to suit your needs.
Optional Features
Elevate your zipper pouch by adding optional features for enhanced functionality and style. Attach a keychain or swivel hook to the zipper for easy access and a trendy look. For durability, add a vinyl lining to make the interior wipeable, ideal for storing small wet items or makeup. Embellish the pouch with decorative elements like ribbons, bows, or appliques for a personalized touch. Consider adding a gusset for a flat bottom, increasing storage capacity. You can also incorporate a reinforced strap or handle for carrying convenience. These optional features allow you to customize the pouch to suit your needs, making it a unique and practical accessory for everyday use or as a thoughtful gift.
Creating a zipper pouch is a rewarding and versatile DIY project, perfect for beginners and experienced sewists alike. With customizable sizes, fabric choices, and optional features, you can tailor the pouch to fit your personal style or practical needs. Whether it’s for organizing small items, serving as a gift, or adding a touch of handmade charm to your daily routine, a zipper pouch offers endless possibilities. This tutorial provides a clear, step-by-step guide to help you master the basics and explore creative variations. By completing this project, you’ll gain confidence in working with zippers and expand your sewing skills. Happy sewing, and enjoy your new functional and fashionable accessory!